Introduction
MVC (Model-View-Controller) is a software architectural pattern that separates an application into three main logical components: Model, View, and Controller. This separation helps in organizing code, making it more maintainable, scalable, and testable. Laravel, a popular PHP framework, follows the MVC architecture. This tutorial will guide you through implementing MVC in Laravel.
MVC Components
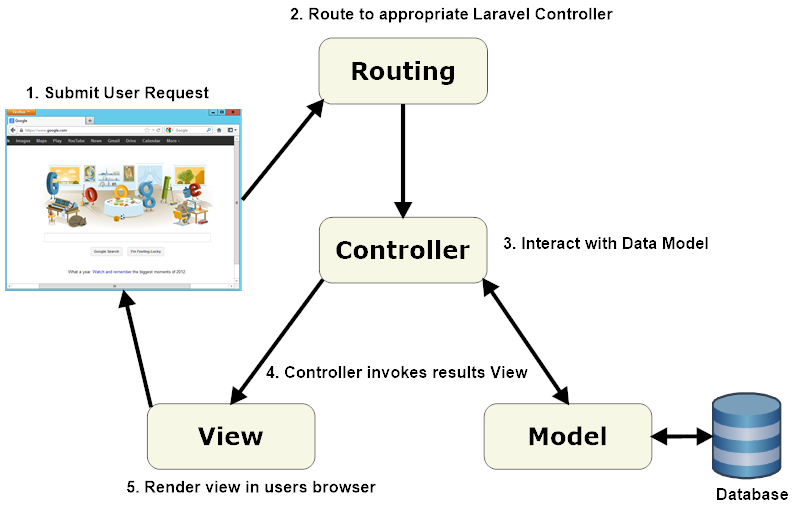
- Model: Manages the data and business logic of the application.
- View: Handles the presentation layer, displaying data to the user.
- Controller: Processes user requests, updates the Model, and selects the View for response.
Setting Up the Environment
Ensure you have Composer and PHP installed on your machine. Then, install Laravel using Composer:
composer global require laravel/installerCreate a new Laravel project:
laravel new mvc_app
cd mvc_app
Directory Structure
Laravel’s directory structure supports the MVC pattern by default:
mvc_app/
├── app/
│   ├── Console/
│   ├── Exceptions/
│   ├── Http/
│   │   ├── Controllers/
│   │   ├── Middleware/
│   ├── Models/
│   ├── Providers/
├── bootstrap/
├── config/
├── database/
├── public/
├── resources/
│   ├── views/
├── routes/
├── storage/
├── tests/
├── vendor/
Step 1: Creating a Model
Let’s create a model for our application using the built-in artisan command to generate a User model:
php artisan make:model UserThis command creates a new User model in the app/Models directory. Add methods to interact with the database in this model.
app/Models/User.php
<?php

namespace App\Models;

use Illuminate\Database\Eloquent\Factories\HasFactory;
use Illuminate\Database\Eloquent\Model;

class User extends Model {
    use HasFactory;

    protected $fillable = ['name', 'email', 'password'];
}
Step 2: Creating a Controller
Next, create a controller to handle user requests using the artisan command to generate a UserController:
php artisan make:controller UserControllerThis command creates a new UserController in the app/Http/Controllers directory.
app/Http/Controllers/UserController.php
<?php

namespace App\Http\Controllers;

use App\Models\User;
use Illuminate\Http\Request;

class UserController extends Controller {
    public function index() {
        $users = User::all();
        return view('users.index', ['users' => $users]);
    }
}
Step 3: Creating a View
Next, create a view to display the list of users. Views in Laravel are stored in the resources/views directory.
Create a new directory users and a file index.blade.php within it.
resources/views/users/index.blade.php
<!DOCTYPE html>
<html>
<head>
    <title>User List</title>
</head>
<body>
    <h1>Users</h1>
    <ul>
        @foreach ($users as $user)
            <li>{{ $user->name }} ({{ $user->email }})</li>
        @endforeach
    </ul>
</body>
</html>
Step 4: Setting Up Routes
Define a route to access the user list in the routes/web.php file.
routes/web.php
<?php

use Illuminate\Support\Facades\Route;
use App\Http\Controllers\UserController;

Route::get('/users', [UserController::class, 'index']);
Step 5: Database Setup
Ensure your database configuration is set up correctly in the .env file:
DB_CONNECTION=mysql
DB_HOST=127.0.0.1
DB_PORT=3306
DB_DATABASE=mvc_db
DB_USERNAME=root
DB_PASSWORD=
Run the migrations to create the users table:
php artisan migrateStep 6: Seeding the Database
To test our application, seed the database with some user data.
database/seeders/UserSeeder.php
<?php

namespace Database\Seeders;

use Illuminate\Database\Seeder;
use App\Models\User;

class UserSeeder extends Seeder {
    public function run() {
        User::factory()->count(10)->create();
    }
}
Add the seeder to the DatabaseSeeder:
database/seeders/DatabaseSeeder.php
<?php

namespace Database\Seeders;

use Illuminate\Database\Seeder;

class DatabaseSeeder extends Seeder {
    public function run() {
        $this->call(UserSeeder::class);
    }
}
Run the seeder:
php artisan db:seed