If you find yourself intrigued by the possibilities of harnessing Flutter’s web app capabilities to launch your impressive Flutter application on the web, you’ve come to the perfect spot! Here at Nuclei, we’re boldly expanding our horizons and enhancing our fintech products by embracing the online
In prior iterations of Flutter, it was essential to import an external package called “flutter_web” to enable web functionality. This often resulted in a multitude of challenges. However, in the latest iterations of Flutter, the Flutter web project has been seamlessly integrated into the core Flutter project. Consequently, the impressive Flutter features you’ve harnessed to develop your exceptional app now seamlessly extend to the web with only minor adjustments needed. This article is dedicated to assisting you in the process of adapting your Flutter application to ensure its optimal performance on the web, while also providing guidance on configuring the appropriate port and hostname for your web application
- First , we gotta make sure that we are either on the flutter `beta` channel or the
masterchannel. - Lets open a terminal and switch to the
betachannel
flutter channel beta
flutter upgrade
Then we enable the support for web by adding into flutter’s configuration :
flutter config --enable-web
- To get a list of all the available config options , just enter
flutter config -hcommand.
If the web support was successful , you should see 2 devices listed when you run flutter devices one is the Chrome device and another is Web Server device.
flutter devices
2 connected device:
Chrome • chrome • web-javascript • Google Chrome 78.0.3904.108
Web Server • web-server • web-javascript • Flutter Tools
You can run your app directly on chrome by selecting the chrome device in your IDE before you run the app or use the following command
flutter run -d chromeIf you want to run it from some external web browser client or something else , it makes sense to just run the web server in which case you would do :
flutter run -d web-serverWell , if you get errors when building your app which complains that it’s not a web app, you just need to run the flutter create command on your project folder. Open the root of your project folder in a terminal and run :
flutter create .[ There might also be a need to run it with the --org option sometimes : flutter create . --org com.exampleapp . Also make sure that your project folder name is made of only lower case letters and underscore]
Specify custom port and hostname :
Your app by default runs on localhost ( 127.0.0.1 ) which means you can’t access it from any other device on your network. If also uses a random port every time you run your app which is not what you want most of the time.
So , let’s fix this.
- Set the port using the
--web-portoption and set a globally accessible hostname (0.0.0.0) using the--web-hostnameoption like so when you run your app :
flutter run -d chrome --web-port 55555 --web-hostname 0.0.0.0Now you can access your web app by opening any web browser in any of your devices in your local network by entering the following address :
http://<your-ip-address>:55555
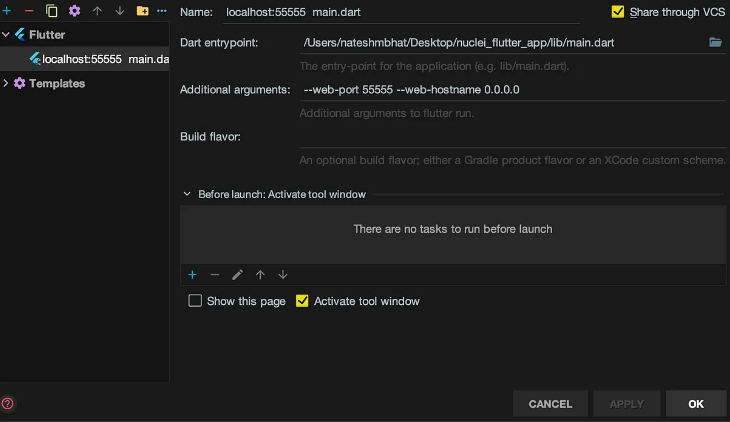
http://192.168.0.100:55555If you are running the web app from your IDE (Android studio or VScode) , you can specify the port and hostname by specifying the additional arguments option on Android Studio like so inside the Run Configurations
If you are using VSCode 🎊 , then you can set it in the launch.json options.
{
	"name": "Flutter",
	"request": "launch",
	"type": "dart",
	"args": ["--web-port", "55555" , "--web-hostname","0.0.0.0"]
}
Build and DEPLOY ! ! !
Now that you have converted your app into a web app , its time to build it and deploy it on free static web hosting services like netlify.com or surge.sh . To build your web app , run the following command in your project.
flutter build webThis will create the build/web folder which you can deploy later.